

 Home
Home Holi
Holi Bigsmall Originals
 Travel

Call Back
Easy ways to make a DIY birthday card for him/her

We all know how difficult it is to make your loved one feel special on his/her birthday. People are elated when they receive presents, but birthday cards just add to the happiness. And if the birthday card is handmade, the happiness just doubles.
We find the market getting filled with cards before any festival, and birthday cards are always there in the market. But these readymade cards do not speak love like the made by yourself. Handmade cards reflect the love and effort put into making your loved one feel special as birthday gifts, but let’s face it, not every one of us has the dexterity to make birthday cards.
Well, you don’t have to worry about that anymore, we got you covered. From pop-up cards to gift cards, from bears with a surprise to memories on a string, here are some easy DIY birthday card ideas for that special person in your life:
Paper Doily Cupcake Card
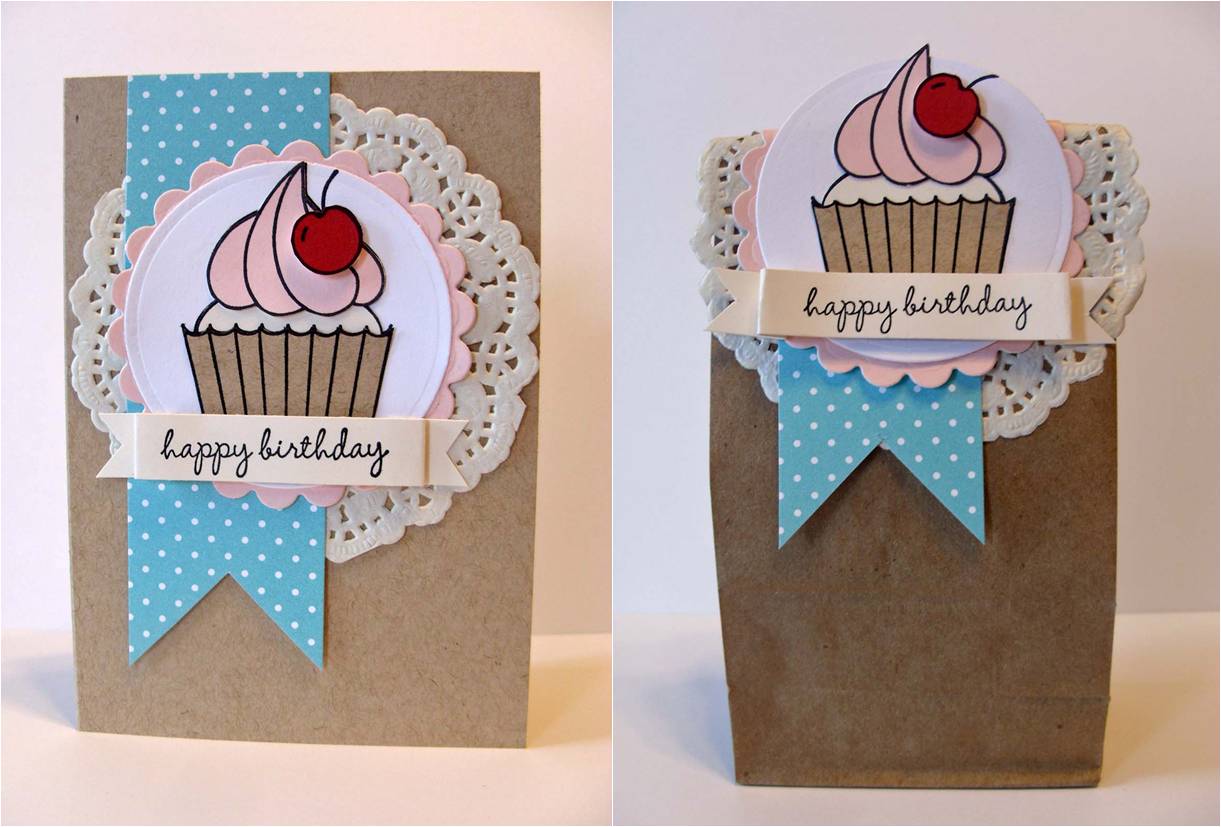
If your partner is a sweet tooth, then this birthday card idea is perfect for you. For this, you’ll need decorative paper (for drawing the cupcake and for the card base), glue, paper doily, paper lace/ribbon.
This card has a paper doily, which is an ornamental mat (as shown in the image), as its background. A paper cut out of a cupcake sits on top of the doily which gives it a kind of an embossed look. Next, write “Happy Birthday” on a paper lace and stick it on top of the cupcake. And voila! Your Paper Doily Cupcake Card is ready. Present this to your special one on their birthday with an assortment of chocolates and cupcakes which you can wrap in a DIY paper bag (which you can make with the similar concept of a paper doily).
Hiding Bear Card

A Hiding Bear Card is my personal favourite because it’s so cute and it’ll surely put a smile on anyone’s face who receives it. It is also very easy to make, even a newbie can do it successfully. For this card, you’ll need brown and white card-stock paper, scissors, glue, marker pen and pencil crayons.
Start by drawing the bear outline as shown in the link and then cut the figure. The next step is to fold the arms of the bear on the inside of the card. Then draw and colour the surprised and smiling face of the bear. Make sure that the arms of the bear cover his face so that its expression remains a surprise until the card is opened. Now you need to make the gifts which the bear carries for your special one.
Cut out gifts from the white paper and colour them to make them look vibrant and exciting. Then stick them to the arms as shown in the link. Finally, write the greetings below the folded arms of the bear for it to be a surprise as well. And there you have it, an adorable bear is here to wish your special one a very happy birthday!
Easy Pop-up Birthday Cake Card

A pop-up card undoubtedly is a great birthday card for the receiver but it is also fun for the maker. No need to be intimidated by the intricate looking design, a pop-up card is way simpler than it looks. Things required to make a pop-up birthday card are A6 Card Stock (or a piece of A5 card which is to be folded in half), white paper (or paper of choice), contrasting paper/colour pens, scissors, glue stick and a lovely cake design.
First, fold the white paper in half and make the outline of the cake on the spine of the fold, make sure the design is symmetrical. Now, you need another paper of contrasting colour which will be slightly larger than the first paper, so that it can become the background of the card on which the popup white sheet will be stuck. Next, cut the shape of the cake. After cutting, bring the crease out and fold the card shut. Then you need to decorate the cake with decorating paper or colour pens. And finally, glue the pop-up sheet to the background sheet and there you have it, a birthday cake pop-up card which will light up the face of your loved one when the cake pops out!
Unfolding Circles Gift Card

If your partner likes gift cards, then this might be the idea you’ve been looking for to make him/her feel special on their birthday. This gift card is super easy to make and it doesn’t require a lot of items. You just need decorative paper, glue and a ribbon/lace (as per your choice).
First, cut four circles of the same size from the decorative paper. Then fold the circles in half. Next thing you need to do is place the four folded circles in such a way that each circle overlaps the next circle (refer the diagram shown below). Glue the overlapping surfaces together to make it secure. After this, what you have in front of you is the basic structure of the gift card.
You can put a note with greetings on it or some light jewellery or anything of your partner’s choice (remember to choose lightweight things as the box may come apart if the object is too heavy). Then fold the upper halves of the circles inward, again overlapping each other in the same way, to close the box and finish it by tying a ribbon or lace of your choice. Present this gift box to your partner and see the glee on their face as they unwrap it to reveal the hidden gift inside.
Mini Birthday Album

Photo albums are a great way to say that you cherish the memories spent with your partner, and what better way to say happy birthday than to gift them an assortment of memories in the shape of an album. For a mini birthday album in a box, you’ll need two sheets of cardstock paper, a 3” square paper mache box, mod podge, ribbon, paper trimmer, ruler, pencil, glue, paper piercer, stapler and decorative items for finishing touches.
First, you need to measure the insides of the box to know the measure of the sheet. The sheet should be slightly smaller than the box. Now you need to cut the sheets according to the width of the box, and score that piece according to the length of the box to create small sections which will hold the photos (refer image given below). Also, leave a little extra gap after scoring so that pieces can be glued together. You can create pockets in some of the sections and put photos or notes in it. Proceed in a similar way with the album.
Now that your album is complete, fold all the sections back and add a little ribbon flap on the beginning section so that, it can be easily pulled out of the box. Now cover the top of the album to cover the staples so that it looks pristine.
For the box, cover the entire with decorative cardstock paper. Now, make a hole in the centre of the lid, and then, tie a piece of ribbon into a loop and pass that loop through the hole in a way that the knot remains inside the box when the lid is shut. Apply Mod Podge on the box and allow it to dry. After the box has dried completely, wrap the box with a ribbon (as shown in the diagram below).
Make a bow from the remaining ribbon and stick it to the top of the lid. For the last step, glue the end of the album to the bottom of the box. Your mini birthday album in a box is ready.
--
There you go people, from last minute preparations to full-fledged DIY cards, all the ideas have been broken down to the basics to make you a pro in DIY birthday cards. The list for DIY birthday cards is a long one but these ideas are the ones which require very less effort and the results are pleasing to both you and your partner. Now all you need to do is get that crafty mind in action and make a wonderful birthday card for your loved one and make him/her feel blessed to have you.

Aman Hans
Aman Hans is not your typical author; but then again, nothing about their career has been typical. With nearly 11+ years of experience building and scaling businesses across industries, Aman has worn the hats of founder, marketer, mentor, and team-builder. Aman channels his real-world insights into the content he writes. Launching a gifting brand in fast-paced markets has taught him more about people, emotions, and events than books could possibly teach. Now, Aman shares his insights in form of thoughtful gift ideas, ways to make your loved ones happy, methods to motivate your team, and everything you need to know about gifting.
Leave a comment